
Running in person sales should not feel like a scavenger hunt through settings.
If you use Shopify POS today, you’ve probably done the thing where you change a receipt default in one area, then jump to payments somewhere else, then you remember tips is tucked away in another menu. And if you have multiple locations or a rotating staff roster… small inconsistencies creep in fast.
Shopify’s new POS Editor is meant to fix that. One place to manage the core POS experience. Fewer clicks. Less missed stuff.
What the new POS Editor is (and why Shopify changed it)
The new POS Editor is a single editor for Shopify POS settings that brings the important configuration controls into one place.
That’s really the headline.
Before, POS settings were spread across multiple screens and menus. Payments lived over here, receipts lived over there, customer info prompts somewhere else, app extensions in a different area entirely. Nothing was “hard”, it was just… scattered. And scattering is how settings get missed, especially when you are busy or delegating tasks to staff.
So Shopify changed the layout with a simple goal : faster navigation and fewer “wait, where is that setting again ?” moments.
Who is this for ?
- Merchants running in person checkout with Shopify POS
- Teams with multiple locations that need consistent setup across stores
- Merchants with staff who need the same checkout flow on every device, every shift
Rollout expectations : you don’t have to install anything. The updated POS Editor rolls out automatically over the coming weeks. When it lands in your admin, it replaces the older scattered path with the new centralized editor experience. Existing permissions still apply, so staff who can manage POS settings today will see the new editor with the same access.
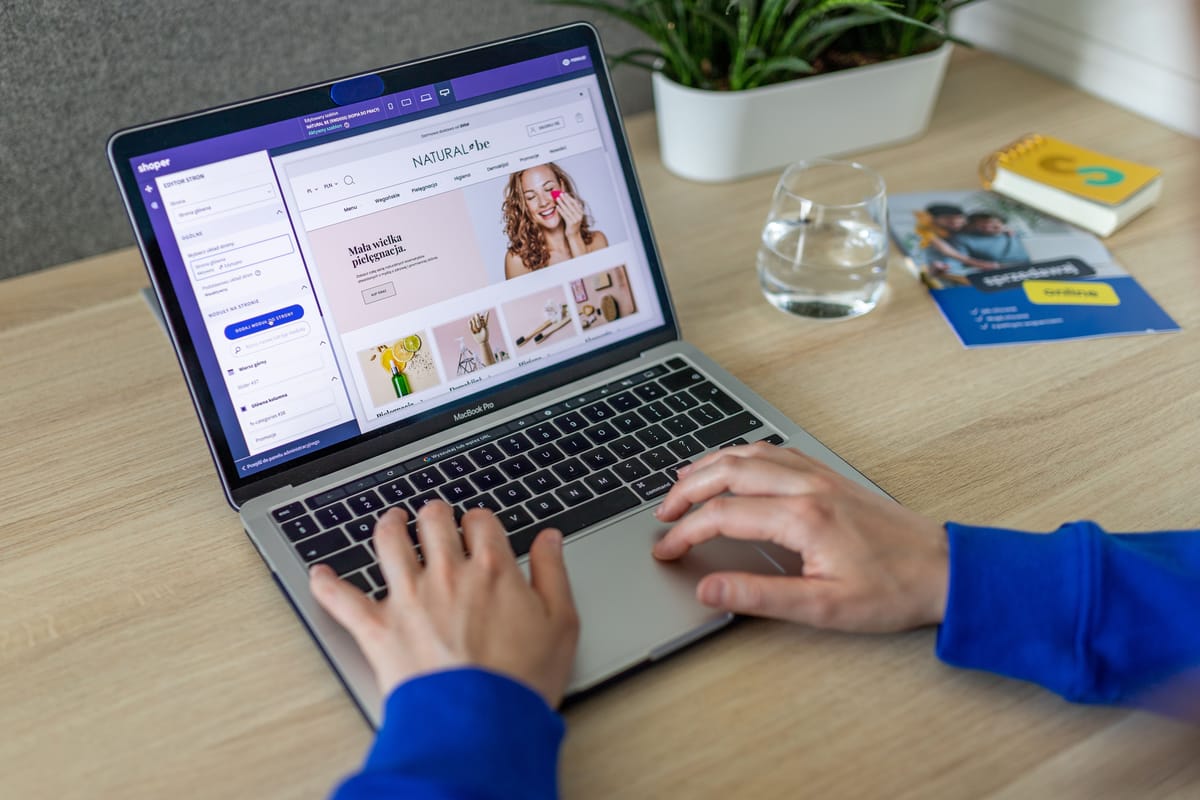
Where to find POS Editor and how the new layout works
Access is still from Shopify admin. The exact label placement can change over time, but the idea stays the same : go to your POS sales channel or POS related settings area, then open the POS Editor from there. Once you’re in, it’s obvious you are in the editor because the whole layout changes.
The biggest visual change is the split panel navigation :
- Categories and sections on one side
- The details and configuration for what you’re editing on the other
That split matters more than it sounds. You stop bouncing back and forth between screens. You can move through settings like a checklist, and you keep context while you work.
You’ll also notice Shopify is adding more inline setup cues and deep links. So if something needs attention, you see it right there, and you can jump to the right spot without digging through menus.
The mental model is basically : one place to review and tune your POS experience end to end.
Payments. Receipts. Tips. Customer info capture. Customer display. Smart grid. Lock screen. Apps and extensions. It’s all meant to live together now.

Global settings : the ‘single source of truth’ for your POS experience
One of the smartest changes is how Shopify is surfacing Global settings.
In the POS Editor, “Global settings” means grouped controls that apply broadly to your POS experience. Think : the decisions you want consistent across devices, locations, and staff, wherever that’s relevant.
Why it matters : configuration drift is real.
If you manage two or five locations, it’s easy for one store to quietly end up with a different receipt default, or different customer info prompts, or a slightly different attribution setup. Nobody did anything “wrong”. It just happens when settings are scattered and changes are made in a rush.
Global settings grouping is Shopify basically saying : these are the levers most merchants want standardized. Put them in one place. Make them easier to review.
Another part that helps is entity level deep linking. You can start from a global view, then jump directly into the specific setting surface you need, without hunting. The editor will point you to the right admin area if something is managed elsewhere.
Practical examples merchants commonly standardize :
- Receipt defaults (print vs digital first, and what’s included)
- Tips behavior (enabled, suggested options)
- Customer info capture (email or phone prompts)
- Staff attribution rules (so reporting stays clean)
Payments : enable methods, see setup status, and control what shows at checkout
Payments inside the POS Editor feels more like a workflow now. Not a set of random toggles.
A simple way to think about it :
- Review what payment methods are enabled
- Confirm setup status right in the editor
- Control visibility at checkout so staff only see what they should use
That setup status piece is important. You can see what’s configured vs what needs attention without leaving the editor. If something is incomplete, the editor can deep link you to the right place to finish setup.
Then there’s the visibility toggle. This is one of those “small change, big impact” things.
If you have payment methods that are technically available but not used in store, hide them. Less clutter at checkout means fewer staff errors, fewer awkward pauses, faster lines moving.
Merchants typically look for options like :
- Shop Pay (where supported)
- Tap to Pay (availability depends on device and region)
- Local payment methods (availability varies by region and hardware)
- Offline payments and manual options (depending on your setup)
Payment settings directly shape the in person checkout flow. What staff see, what customers are prompted for, and how smooth the payment moment feels. So having it in the same editor where you manage the rest of checkout is, honestly, overdue.
Receipts : customize what customers get (and how they choose it)
Receipts are another area that used to be easy to set once and then forget… until a customer asks for SMS receipts, or you realize one location has different business info showing, or staff keep selecting the wrong option because the defaults are awkward.
In the new POS Editor, receipt configuration is pulled into one place. You can manage receipt content and formatting, plus delivery options where they’re supported.
A big part of this is customer receipt selection. You can let customers choose email, SMS, or print (as applicable to your setup) and set sensible defaults so the checkout does not turn into a mini interview every time.
Receipts are also brand and compliance. They need the right business details, consistent formatting, and a clean presentation. When receipts vary by location or device, it looks messy, and it can become a support headache later.
On the staff workflow side, better receipt defaults means fewer prompts, fewer mistakes, and less time spent tapping through options while the next customer is waiting.

Tips and staff attribution : cleaner reporting and a smoother checkout flow
Tips can be simple, or they can get complicated fast depending on payment method, hardware, and how you run your store.
The POS Editor handles tips setup at a high level : enable or disable tips, choose suggested tip options, and control how tips appear in the checkout flow.
Right alongside that, Shopify is surfacing staff attribution more clearly. And that is not just an “admin nice to have”.
Attributing sales and tips to staff matters for :
- Reporting and performance insights
- Payroll workflows (especially if tips are part of compensation)
- End of day reconciliation
- Reducing disputes later (who handled what, what tips were collected)
Operationally, a cleaner attribution and tip flow usually means faster checkout and fewer awkward moments at the counter.
One note worth taking seriously : tip behavior can differ by payment method and hardware. So if you change tip settings, test it in a non peak moment. Run a small transaction. See exactly what staff see, and what customers see.
Customer info and the customer display : make in person checkout feel modern
Two things can make in person checkout feel instantly more “modern” : smart customer info capture, and a clear customer facing display.
In the POS Editor, customer info settings cover when you prompt for email or phone and how that fits into checkout. Capturing customer details can help with :
- Sending receipts
- Building customer profiles for CRM
- Marketing follow ups, where compliant and appropriate for your region
The key is to be intentional. If you prompt for info at the wrong time, or you ask twice in different ways, staff stop asking, customers get annoyed, and your data ends up messy.
Then there’s Customer display. This is what customers see during checkout, like the order summary, totals, and prompts. It reduces confusion because customers can verify items and totals in real time. That transparency builds trust, and it also reduces mistakes that lead to returns or awkward “wait, why is this total higher ?” conversations.
Practical tip : align customer info capture with receipt defaults. If your default receipt is email, make sure your flow supports collecting email smoothly. If you lean print first, don’t force staff into email prompts they do not need.
Smart grid, lock screen, and day to day POS controls you can manage faster now
These are the settings teams actually tweak in real life.
Smart grid customization lets you organize tiles and actions for the workflows your staff uses most. If your grid is messy, checkout slows down. Refunds take longer. People ask each other where buttons are. Training gets harder than it should be.
Shopify also talks about POS blocks conceptually here, meaning configurable sections that influence what appears and how staff interact with the POS interface. The practical point is : you can make the POS feel like it matches your store’s rhythm.
Then there’s Lock screen settings. This matters for security and shared devices. A locked down device reduces accidental access and protects customer data and store settings. It also helps when devices get left unattended, which happens more than anyone wants to admit.
The big benefit of the new POS Editor is speed. These day to day controls are no longer “somewhere in settings”, they are right there in the same editor you’re already using.
Apps and extensions : manage POS app extensions without the scavenger hunt
If you use apps with Shopify POS, you’ve probably felt the friction : install an app, then go find where it shows up, then enable it, then configure it, then figure out how staff will access it during a transaction.
Shopify POS app extensions (including action extensions) add functionality at checkout or inside staff workflows. Think : loyalty prompts, custom discounts, delivery workflows, specialized product lookup, whatever your stack requires.
The new POS Editor makes app discovery and management simpler. You can see what’s installed or available and jump into configuration. And when you enable an app in the editor, Shopify now activates its POS block and action extensions in one step. No second trip to another settings area.
If you are familiar with Shopify’s Online Store editor, this will feel similar. Same editor style approach, but applied to POS. Which is nice, because it reduces the learning curve. Your brain already knows how the left side navigation and right side detail panels work.
A practical setup checklist : how to move your POS settings into the new editor
Even though the update rolls out automatically, it's still worth doing one intentional pass through the new editor. Just once, calmly, not during a rush.
Here's a practical flow :
Payments
- Review enabled payment methods
- Check inline setup status
- Hide payment methods that should not appear at checkout
Receipts
- Confirm receipt format and required business info
- Set delivery defaults (print vs email vs SMS where supported)
- Decide whether customers can choose receipt type at checkout
Tips
- Enable or disable tips
- Set suggested tip options
- Test with your common payment methods
Customer info
- Decide when to prompt for email or phone
- Align with receipt defaults so you are not asking twice
Smart grid
- Put the most common actions where staff can find them fast
- Remove or de-prioritize rarely used tiles
Lock screen
- Configure security behavior for shared devices
- Make sure staff know what to do when switching shifts
Extensions
- Enable the extensions you actually want staff using
- Place and organize them so they are visible during the workflow
After you make changes, validate them on a real device and a real session :
- Run a test transaction
- Verify what payment methods show up
- Confirm receipt delivery works
- Check tip prompts
- Make sure the customer display shows what you expect
If the editor flags something as incomplete, use the deep links to jump directly to the right admin surface and fix it quickly.
Last thing. Consistency wins. Document your decisions for staff. What's enabled, what's hidden, and why. It saves you from repeating yourself later.
What stays the same (and what’s genuinely better) with POS Editor
POS Editor is mainly about centralized configuration and improved navigation. It’s not changing how Shopify POS fundamentally processes sales.
The genuinely better parts are the ones you feel every week :
- One place to manage settings that used to be spread out
- Global settings grouping, so your defaults stay consistent
- Inline setup status in payments, so you spot issues early
- Fewer clicks and less backtracking
Real world impact looks like :
- Faster onboarding for new staff
- Fewer checkout interruptions caused by confusing settings
- Easier standardization across locations and devices
And honestly, this is a future proofing move. As Shopify expands POS features and app extensions, having a central editor reduces complexity. You get more power without turning settings into a maze.
Conclusion
The new Shopify POS Editor is a simple idea done properly : stop making merchants hunt for the settings that control checkout.
If you run in person sales, especially across multiple locations or with multiple staff, this update should save time, reduce mistakes, and make your POS experience feel more consistent. Payments, receipts, tips, customer info, smart grid, lock screen, extensions. All in one place, in a layout that feels familiar.
When the rollout hits your store, take 20 minutes, do one clean pass using the checklist above, then test on a real device. After that, you can get back to what matters. Serving customers, not digging through menus.
FAQs (Frequently Asked Questions)
What is the new Shopify POS Editor and why was it introduced ?
The new Shopify POS Editor is a centralized, single editor for managing all Shopify POS settings in one place. It was introduced to replace the previous scattered settings layout, making navigation faster and reducing the chances of missing important configurations. This change aims to streamline the management of payments, receipts, tips, customer info prompts, app extensions, and more, enhancing consistency and efficiency for merchants.
Who can benefit most from using the new Shopify POS Editor ?
Merchants running in-person checkouts with Shopify POS, especially those managing multiple locations or teams with rotating staff rosters, will benefit greatly. The editor ensures consistent setup across stores and provides staff with the same checkout flow on every device and shift, reducing inconsistencies and errors during busy operations.
How do I access the new POS Editor in my Shopify admin ?
You can access the new POS Editor directly from your Shopify admin by navigating to your POS sales channel or POS-related settings area. From there, open the POS Editor to experience the updated split panel layout featuring categories and sections on one side and detailed configuration on the other. The rollout is automatic over several weeks, so no installation is necessary.
What are Global Settings in the Shopify POS Editor and why are they important ?
Global Settings are grouped controls within the POS Editor that apply broadly across devices, locations, and staff. They serve as a 'single source of truth' to maintain consistency in key areas like receipt defaults, tips behavior, customer info capture, and staff attribution rules. This grouping helps prevent configuration drift that can occur when settings are scattered or changed hastily.
How does the new POS Editor improve payment method management ?
Payments management in the new POS Editor is designed as a streamlined workflow where merchants can review enabled payment methods, confirm their setup status without leaving the editor, and control which methods appear at checkout. This reduces clutter for staff by hiding unused payment options, minimizes errors during transactions, and supports various payment types including Shop Pay, Tap to Pay, local payment methods, offline payments, and manual options.
What improvements does the new POS Editor bring to receipt customization ?
The new POS Editor centralizes receipt configuration into one place allowing merchants to customize receipt content, formatting, and delivery options such as SMS receipts where supported. This consolidation helps ensure consistent business information across locations and simplifies choosing default receipt options for staff, enhancing customer experience and operational accuracy.
